How many times does your toddler have a meltdown because she does not have the ability (yet) to dress her doll in the clothes the doll came with? I am amazed by some of the clothes toy companies manufacture. Why are they so tight? Why are they so fiddly? And why oh why are the designs sometimes better suited to a pole dancer rather than to a child's doll?
Toy companies seem to have forgotten that the average 3-5 year old has an attention span of about 20 seconds and that, coupled with the fact that their fine motor skills are only just developing makes it phenomenally difficult for most toddlers to dress their dolls by themselves. And here's the rub: all they want to do is do EVERYTHING for themselves at this age.
And so ... there's my problem and here's my solution.
I'm no seamstress. But I do really,
really enjoy sewing simple creative projects, especially if they bring some fun and joy to Elise.She adores dressing her doll and asked me the other day if Dolly could have some more clothes. "Why not?" I thought. So Elise and I went to our favourite Spotlight shop, bought some material off-cuts and off I went.
My latest design is extremely simple and will fit a doll that is approximately cm tall. The crucial bit is this: the design is so simple even a 3 year old could dress her doll with this dress and do it all by herself. No meltdowns. No stress. Happy lives for all. :)
All you need is:
- Some pretty fabric (for this design I have chosen a lime green and purple for the straps)
- Some elastic
- Thread, needle and pins
- And some pretty bow embellishments if you want them (more on that later)
So let's get started!
How to make the dress
1. Cut out a piece of material 48cm wide x 26cm long. The width needs to be long because you'll gather it together at the neckline to create a ruffled look. It might seem ridiculously big for the size of your doll but it will all make sense soon!
2. Lie the material in front of you, with the width running along the top and create a neckline hem. You want to create a wide hem because this is where you'll run your elastic later. Pin the hem down to keep everything level.
 |
| Step 2 |
3. When you sew the hem, you want to keep a really tight stitch that is close to the edge. This will allow for your elastic to move easily through the hem.
 |
| Step 3 |
4. Next get a safety pin and thread it through the elastic. Don't cut the elastic yet! Thread the elastic through the hem (if you've left plenty space, this will take about a minute to do):
 |
| Step 4 |
5. Loop the finished hem around your doll to make sure you make it tight enough (I suggest making it tighter than the circumference of the doll's chest) and sew the two ends of elastic together. Make sure it is very secure... the more you sew and knot the thread around the two ends of elastic, the better.
 |
| Step 5 |
6. Now the dress looks like a cone, with a tighter elastic 'neck' and a wider base. Turn the dress inside out and pin the two open sides together. Sew them together to make the back hem.
 |
| Step 6b Pin the two edges together |
 |
| Step 6a Fold your two edges over |
 |
| Step 6c Turn the dress the right way out and marvel at your skilled straight seam! I did! |
7. Nearly there! You just need to hem the base of the dress now to suit the height of your doll:
 |
| Step 7 |
How to make the straps
8. Now for the shoulder straps. Cut out a piece of material roughly 11cm wide x 14cm high. And then divide it into two equal strips (5.5cm x 14cm). Turn over the rough edges to create a seam on the inside of each strap, pin it and sew it up.
 |
| Step 8 |
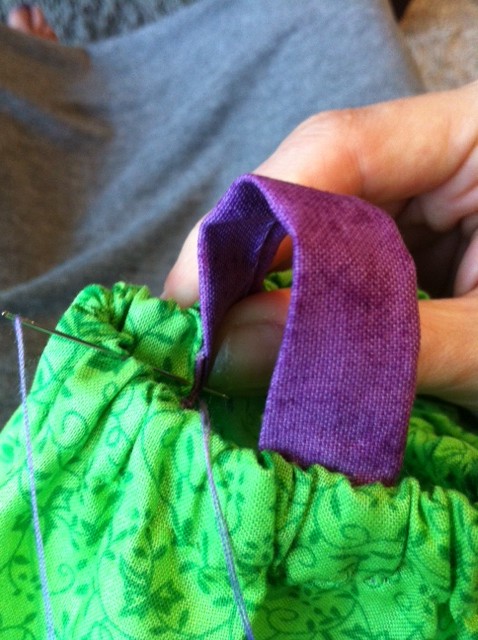
9. Turn over the end of one strap and sew it into the dress at the appropriate spot (over dolly's shoulder). You might find it easier at first to pin it and secure it in place.
 |
| Step 9 |
 |
| Step 9 |
10. Then do the same for the back-strap attachment. Be mindful to sew all the way around the strap - for example make sure the front of the dress is also attached to the strap with some 'invisible' sewing! See picture 10b. Then repeat for your second strap.
 |
| Step 10a |
 |
| Step 10b |
11. Add any embellishments. I've used some cute bows which I bought from our $2 shop and then just sewed them on like I would a button. I've seen all sorts of embellishments: pretty images you can iron onto the fabric; buttons; ribbon; beads... the list is really endless!
And voila! A cute and easy dress to make and more importantly... a dress that Elise can easily put on her doll without any assistance from an adult.
Here's another dress I have made using the same simple design:
Happy sewing and happy play time!
Love and hugs,
Rebecca and Elise x