Friday, September 25, 2015

How to Make a Cot for Dolly!

Elise is a lucky girl: she has lots of toys but she particularly loves her dolly, whom she has named Baby Wawa (apparently the doll cries a lot)!

Baby Wawa has everything done for her. Elise dresses her, feeds her, baths her and takes her out and about in a stroller. But Baby Wawa did not have a bed. Until today.

Here's Baby Wawa all snuggled up in the finished cot:


If you'd like to make a cot similar to this, here's what you'll need:

1. A fairly big shoebox
2. Some pretty paper (use a thickish paper so it doesn't tear)
3. Two different materials (1 for the cot base and another for the duvet and pillow case)
4. An old, cheap pillow full of foam
5. Scissors
6. Needle and thread (if you're like me)... if you're super organised, then a sewing machine!

Here are the steps:

1. Cover the inside and outside of your shoe box with the colourful, patterned paper and glue it down. Be sure to glue all the edges as well - you don't want them to tear. I chose to cover the long sides and base as well but leave a pretty scalloped edge along the shorter sides.


Step 1

2.  Tear open your cheapy pillow. I bought mine from a pound shop (here in Singapore, we have DAISO which is a Japanese shop where everything is just $2). I'm not interested in the pillow itself, but the foam that's inside it. Take that out and cut a piece to size that would make a nice mattress for the cot. 

Step 2


3. Next, take the material you want for your 'mattress'. I chose a spotty material. Turn it inside out and fold it around your 'mattress'. Pin it so that the material fits around it neatly and snugly and then sew the edges together, leaving one side open.

Step 3


4. When three edges have been sewed up, remove the foam mattress, turn the material pocket the right way round, reinsert the foam mattress and then you just have the final edge to sew up. I find hand stitching fun (albeit time consuming) but you might prefer using a sewing machine!

Step 4


4. Now, take your second piece of material and measure out a 'duvet' size piece of material (you'll need two identical pieces of material) making sure you cut out a slightly bigger piece than you need to take account of the inner hem / stitching. I used a pretty floral print with the same pink as the mattress base.

5. Turn your material inside out and pin it. Stitch up three sides leaving a longer edge open.


Steps 4-5


6. Turn the 'duvet' the right way round and insert the foam. Sew up your open edge. 

Make sure the foam is flat; you don't want it bunching up at one end after your child has played with it for the hundredth time! I actually pinned the foam to the duvet from the outside and then sewed some sequin ribbon across the duvet to a) make the duvet look prettier and b) to secure the foam inside and stop it from moving or bunching up. You can see the pins in the photo below before I sewed the sequin ribbon across. 

Step 6


7. Put it all together and then watch your child enjoy learning about putting their dolly to bed every night and waking them up every morning for breakfast!!

Step 7


Love and hugs,
Rebecca and Elise x

Creating a Fun Peppa Pig Picture!

Ever since Elise was about two, she became mildly obsessed with Peppa Pig.

To be truthful, Ross and I love Peppa too - it's a wonderfully simple but clever concept and it teaches Elise a lot about life as a toddler.

My mum, Linda, sends Elise a copy of Peppa's magazine from the UK to us here in Singapore every month... sometimes twice a month! And we thought it might be nice to send a picture into the magazine of Elise's favourite little piggy.

This is the photo we sent into the magazine, so we will see if Elise gets herself published! I really believe in celebrating your children's work - whether it's a picture or a sculpture or a mound of clay. Our kitchen is awash with Elise's art!

And what better way to 'celebrate' and showcase Elise's efforts, than to post her picture to a magazine that she loves??


Here's a close up of the picture.


It's very simple. Elise and I:

1. Used a black waterproof pen to draw the outline of Peppa (all that I did really)
2. Stuck on lots of red shapes to create Peppa's dress
3. Added some googly eyes
4. Used blue glitter glue to make Peppa's mouth
5. Used pink wool and glue to create the nose outline
6. And pink pipe cleaners to create her arms, legs and tail

A quick and fun idea! I'll update this post if Elise and her picture are featured in the magazine!

Love and hugs,
Rebecca and Elise x

Create a Lantern for Mid Autumn Festival

Elise's preschool, White Lodge (which we adore), posed the children with a challenge this week: to make their very own lantern for the 'parade' to take place today.

Being completely obsessed with the film 'Frozen', Elise asked me if we could make an Elsa lantern.

"Why not?" I thought...

And here she is today outside her school, September 25th 2015, proudly holding the finished product:


If you want to know how we made it, I tried to document the steps:

What  you will need:

  • A picture of Elsa that you like
  • 1 piece A4 paper 100gsm
  • 1 piece glittery card, roughly 30cm square
  • White craft glue that dries clear
  • Pencil
  • Waterproof pen
  • Colouring pencils or glitter glue
  • Pom poms, stickers, shapes to decorate Elsa's skirt
  • Stapler
  • A fake tealight (i.e. one that turns on with a battery)
  • Some heavy duty tape


1. Find a picture of Elsa that you like online or from a book. Use fairly thick paper (I used 100gsm A4 and folded it in half - you'll see why later). Draw a pencil outline of Elsa on one half of the paper, then use a waterproof pen to go over the pencil. Don't worry about the back of the picture - we will come to that later.

2. Decorate the image. Elise and I used glitter glue because it's vibrant and fun to use but you could use whatever you like - coloured pencils, crayons, markers etc. I particularly like Elsa's lips on ours :)

3. Next cut around the 'front' image but don't cut around the edge where the paper fold is. Leave that intact; this will keep the top half of your lantern attached for as long as possible and it make it easier for you to draw the reverse image too. Let the glitter glue dry!


Steps 1-3
4. Next, turn the picture over and use the shape you have cut out to draw the reverse of the image. It doesn't have to be perfect remember. You'll see I have still left the bottom part of the picture (by her arm) intact - I haven't cut that bit out yet. 

5. Decorate the reverse image!

Steps 4-5

6. Open the inside of the lantern up and use sticky tape to stick down a handle. I used a sequin ribbon because it can sit flat and also because the silver, sparkly effect sits well with Elsa and her frozen, magical theme. You could use string as well of course. Create a handle at the top and make sure you have plenty of string or ribbon left hanging at the bottom. This will help you fit the top of the lantern to the base later.

Step 6

7. Let's make the base. We used a big square piece of glittery blue card - this would become Elsa's skirt. The card I used measured about 30cm square and this worked well. Turn the card around into a cone shape to create a 'waist' and a skirt 'hem'. Use a stapler to fix it together. Then cellotape the inside seam to give some extra strength.

Step 7

8. To decorate the skirt, Elise and I enjoyed putting lots of blobs of glue all over it and then added colourful decorations such as pom poms, shiny leaves and even added some snowflake stamps (we had a stamp in our Christmas decoration box!). I also cut along the edge to give a wavy effect like a dress and cut a V shape into the waist.

Step 8

9. Once your two pieces are completely dry (you don't want all your pom poms falling off!) you are ready to attach the top of the lantern to the base.

Slide the 'waist' of Elsa into the skirt, using the ribbon to help you. Once it is in place you can cellotape the ribbon to the inside of the skirt to secure it. This means when Elise holds her lantern by its silver handle, it is attached through the whole lantern (it is stuck to the inside of the Elsa image and to the skirt base) which makes for a robust lantern!

10. Get your tea light and slide it up into the 'waistline' of the lantern. You might have to switch it on from the outset! Tape it along its base to the inside of the card 'skirt' and hei presto, you have a glowing lantern!

Step 10

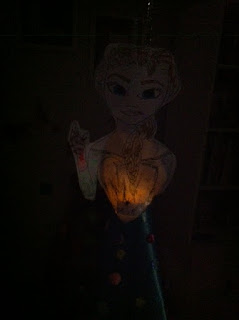
We tried it out in the dark to see how effective Elise's lantern really was:


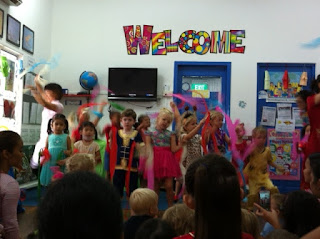
I thought I'd share some photos from the Lantern Festival celebration today at Elise's school. Here are the teachers performing a dance:


 And some of the older children performing a dance as well!


And Elise enjoying a Moon Cake in the car on her way home from school!


Love and hugs,
Rebecca and Elise x